Building a physical git device with Arduino
- Published on
Last Fall I got to delve into the world of physical computing via Arduino for one of my grad school classes at the University of Washington. For this class, everyone got to choose their own project to work on (with most all of these being individual projects). Having free reign was a bit alarming at first since I prefer to deal with constraints of real-life issues. We had several guest speakers who work on physical installations or devices come and talk about their work, which helped a lot in generating some ideas. A few speakers, including Kelly Franznick from Blink UX & Plamena Milusheva from LMN Architects, worked on light installations, and while doing an art installation was something I was contemplating, I also wanted my project to solve some sort of problem I could relate to.

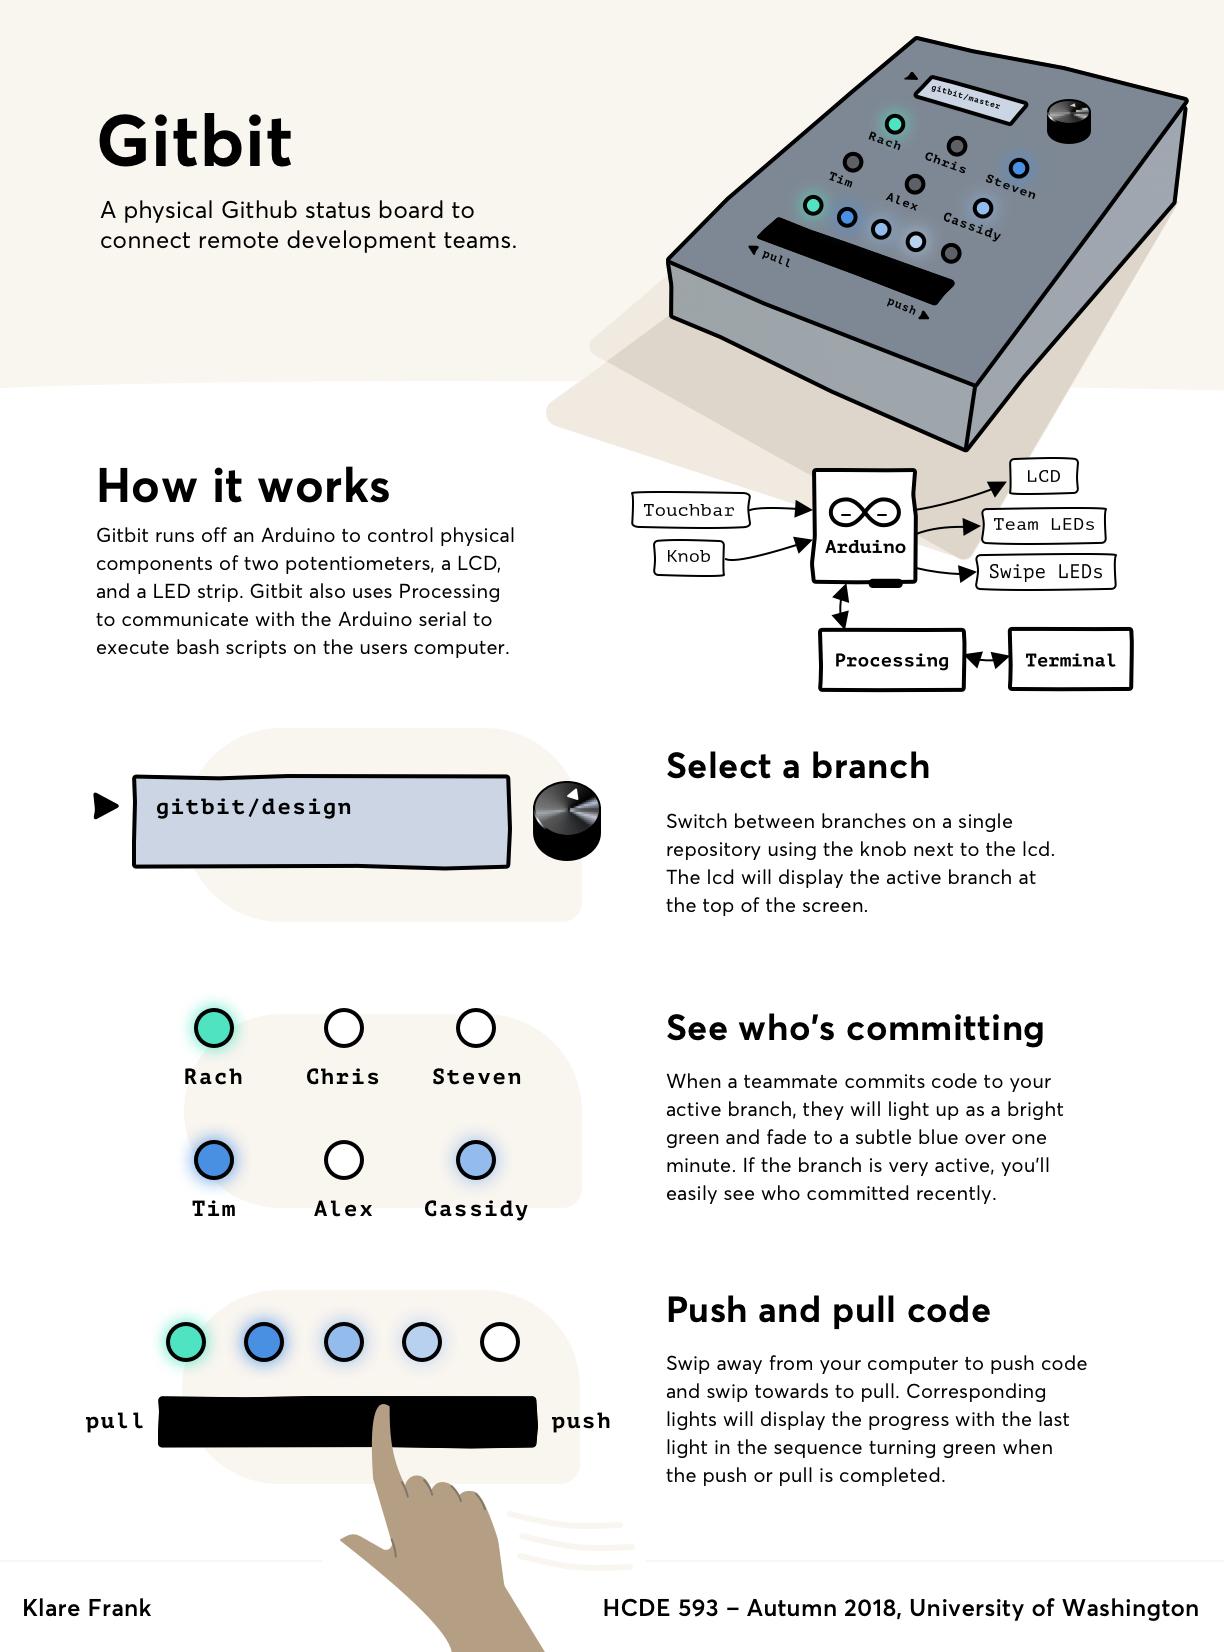
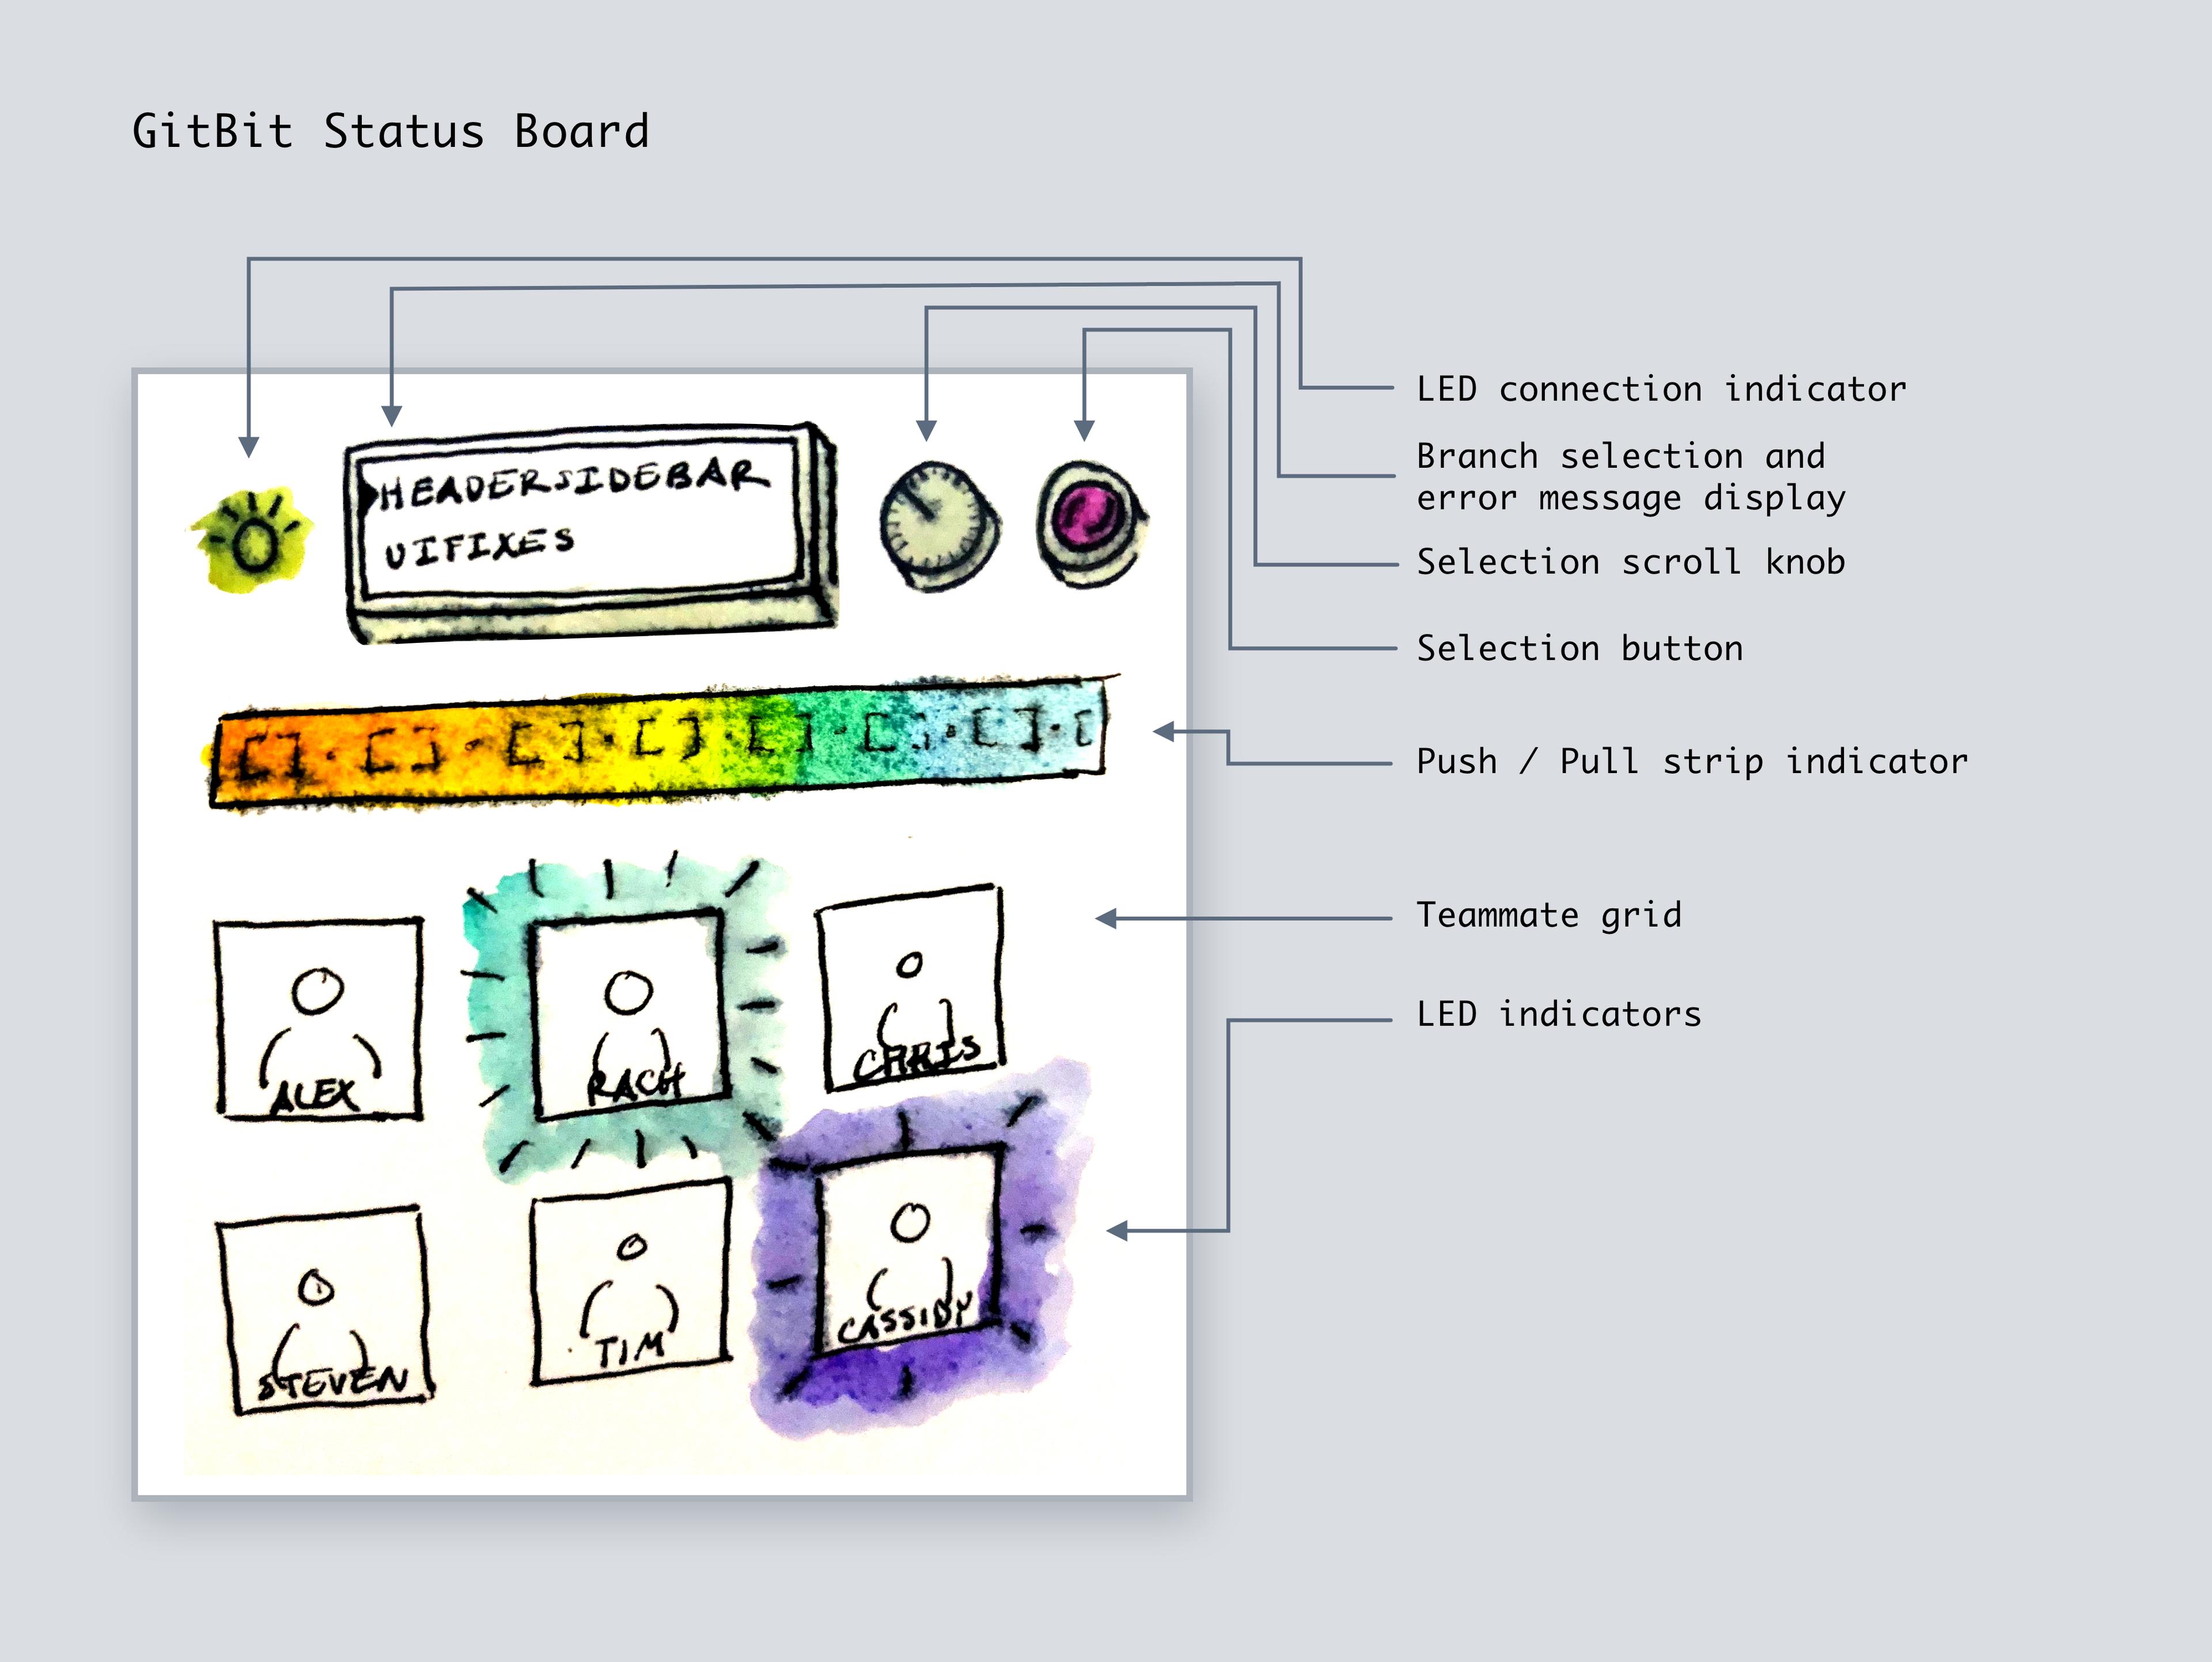
Since I've been working remotely for the past four years, primarily surrounded by a lot of developers, I ultimately decided to build a prototype for an idea that combined those two realms. What I built was a box intended to sit on a desk next to a computer and would connect with your team’s main GitHub or GitLab repo. It is comprised of three parts: 1.) a branch selector, 2.) a grid of coworkers which lights up when commits are made to the selected branch, and 3.) a soft potentiometer which allows the user to push and pull code to that branch.
Sketch including indicator lights, led panel, knobs, and buttons

Be warned, this is a fairly rough prototype. Given that I needed to dedicate most my time to the actual build, I didn’t do any user research, so the practicality of this device is in essence only; it doesn’t consider all the weird git merge errors you’d have to solve or the use cases of what it’s like working on different dev teams. It also doesn't consider the implications all these notifications could bring up. I hate having any notifications active in Slack, so I'm 99.9% sure having cool lights that pop up would bug the hell out of me.
With that being said, I feel like having a physical device for remote workers might be a nice way to connect them together. It doesn’t HAVE to be a device like this, but playing with a string of leds and a nice tuner knob was pretty damn fun, so I went with it.

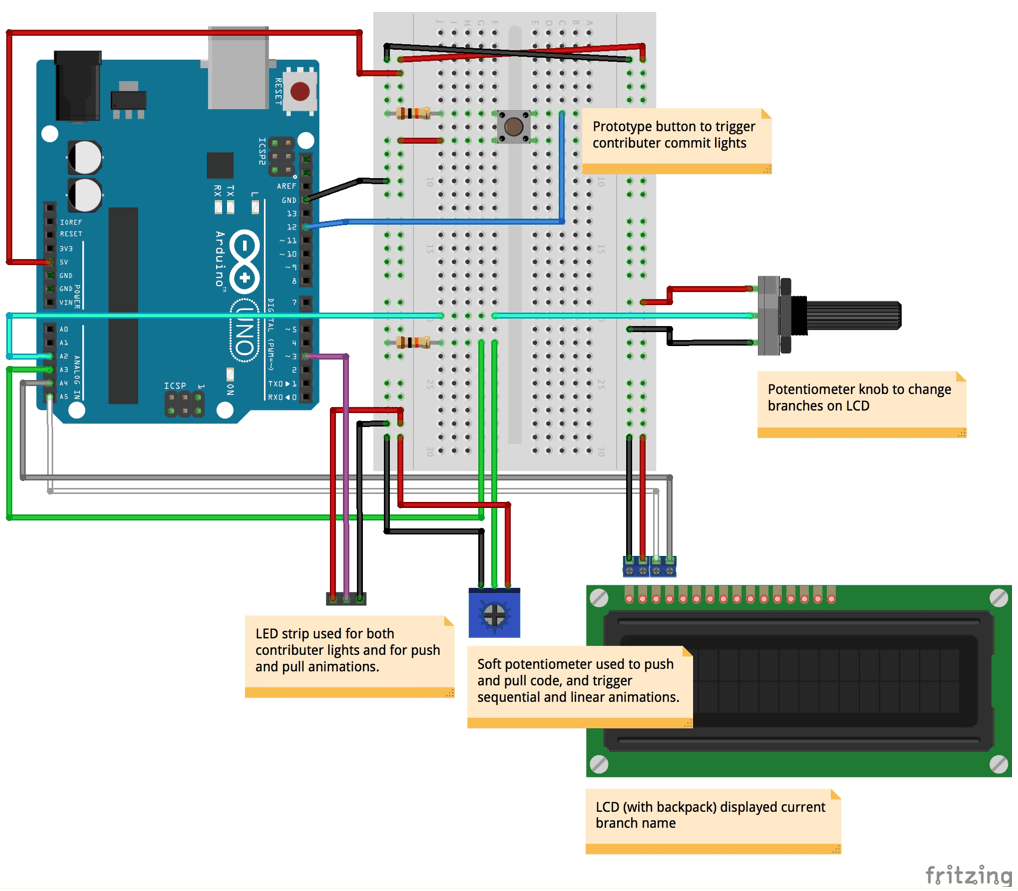
The Arduino plugs into the computer’s usb for power and serial communication with Processing to execute bash scripts via the computer’s terminal. Two potentiometers, one knob and one linear, and a hidden demo button on the back of the device act as user inputs. A LCD, LED strip (contains both team LEDs and swipe LEDs) are outputs on the device.

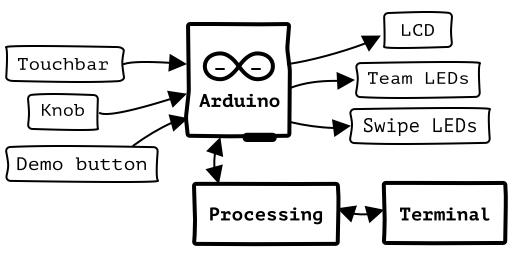
When a user plugs in the gitbit device to their computer, the device will initialize by lighting up the leds in a sequence and turning on the LCD to display the active branch.
A user can change branches by turning the potentiometer knob to the right of the LCD. The code checks for a change on the potentiometer knob through analog input. It maps the value to the length of the vector containing branch names and then prints the name associated with the mapped knob value to the LCD.
The demo button on the back of the box checks for a press and then lights up a random LED within the list of team LEDs to start off bright green and fade to blue over 20 seconds. The fading animation was designed to help users detect more recent team member commits.
The soft linear potentiometer, or touchbar, detects an analog value and maps the value down to between 0 and 10 to account for value variance. Once one side of the touchbar is pressed, the code will change the gesture state to in progress. If the gesture is fully completed (a swipe across the entire soft potentiometer), the gesture state changes to complete. If a gesture state is complete, a “push” or “pull” string is printed to the serial corresponding to the direction. Additionally, an animation sequence will light up the five LEDs above the touchbar to indicate progress and then either the left (for pull) or right (for push) in green to indicate the action is complete.
If Processing is running, it will check the Arduino serial for strings containing a value or pull or push. If either string exists, the code will execute a corresponding bash script to either pull from or push to the predefined Github repository.
The First Prototype
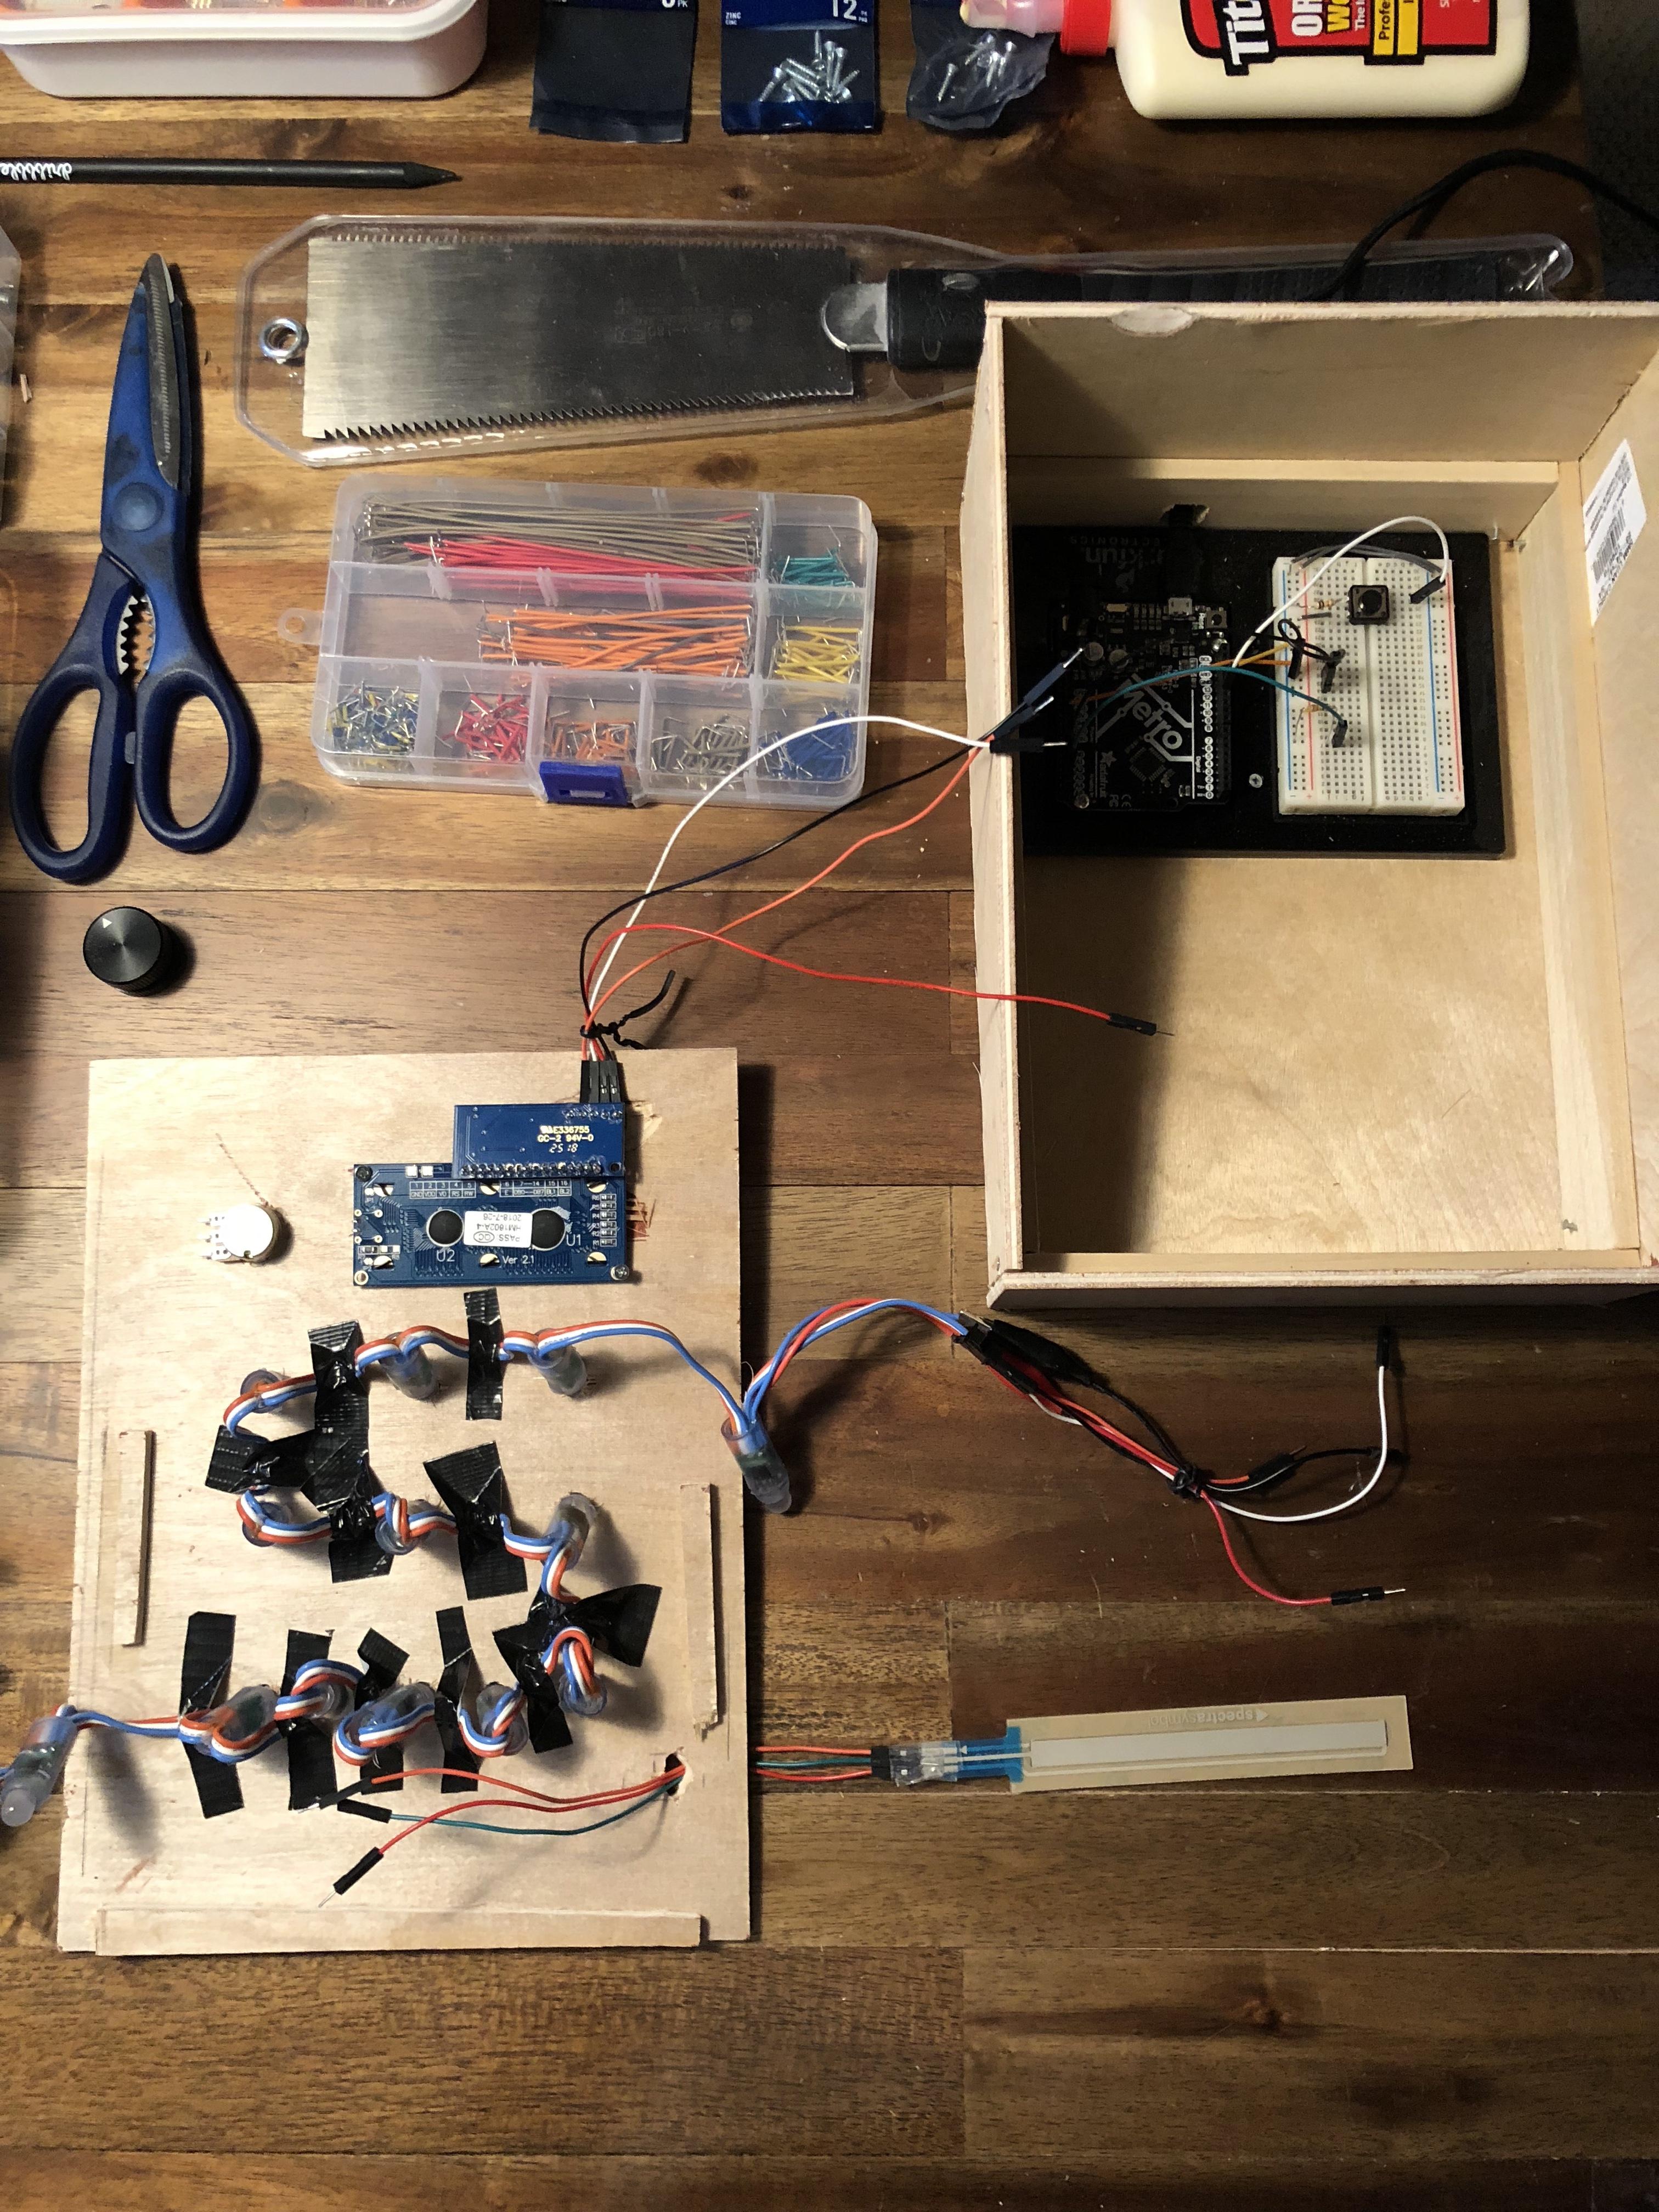
To start out, I prototyped all the physical parts together with some VERY rough code. I wanted at the very least to make sure everything worked together. I was traveling to Japan the following week for vacation, so I really wanted to get everything down while my mind was still fresh. To complete this prototype I used:
- An Adafruit Metro
- Half-sized breadboard
- LCD with soldered backpack
- Two buttons
- An LED
- A potentiometer knob
- Lots of poorly organized cables
- Two resistors
- A demo button to simulate a coworker making a commit
Once I had the basics working, I cut out a cardboard face for the prototype so I could also see what it might look like and do some rudimentary user tests to make sure the parts I had picked out were the right ones for the tasks. I also replaced the single LED with a string of individually addressable LEDs so I could control all the lights from only three pins.


This worked out fairly well as a first prototype, but it had some major issues:
- I really wanted it to feel more solid, and I was afraid of touching or moving the entire device for fear of it falling apart.
- I also was interested in introducing swiping functionality, as a touch potentiometer strip would solve the issue of the potentiometer knob being in the last used position (pull or push) when in real life, we may push or pull multiple times before doing the other. However, I didn't want to lose the knob entirely, because it was pretty smooth and a real joy to use.
- Any animation used a delay function which prevented any other action from occurring while that animation was running. I was planning on having some long indicator light animations, and this wasn’t going to cut it.
Despite having some issues, I put it all down to go on vacation.
Second Prototype
Fast-forward three weeks through many bowls of ramen.
I still had a very crucial issue with my first prototype: activating any LED animation prevented any other action from occurring. Luckily, my boyfriend, who is a C++ programmer for ground control systems for rockets (the space-traveling kind), got wind that programming in Arduino had a lot of crossover with C++ and he wanted to help. I ended up learning a lot about C++ and just how different (and similar) it is to Javascript than I ever thought possible.

Refactoring the code
With his help, I had to change all of the animations to run based on time instead of delay, by comparing the current time to the start time in milliseconds and storing that value in an update function for the LED. The update functions for the button, the selectableLCD, and the swiper also use an update function to check states.
virtual void update() {
    switch (getState()) {
    case AnimationState::READY:
        _led->off();
        return;
    case AnimationState::RUNNING:
        {

        uint32_t currentTime = millis();
        if (checkComplete(currentTime)) {
            _state = AnimationState::COMPLETE;
            return;
        }

        Color currentColor = {
            linearInterpolation(_startValue.red, _endValue.red, currentTime),
            linearInterpolation(_startValue.green, _endValue.green, currentTime),
            linearInterpolation(_startValue.blue, _endValue.blue, currentTime)
        };

        _led->setColor(currentColor);
        return;
        }
    case AnimationState::COMPLETE:
        _led->setColor(_endValue);
        return;
    }
}
Creating classes for multiple kinds of animations (fading, dual color fading) and groups of animations (parallel and sequential) made it easier to have the same level of control over color and duration while not having to repeat the same code over and over again for multiple lights. One of my favorite things about the way LEDs and animations were coded is that you can create multiple LED animations and push them to a vector, and then use the sequential animation class update functions to execute the entire sequence of animations. There were definitely a lot of things to play with here that I could’ve created an entire project focused just around LED animations.
void createPushPullAnimations() {
  std::vector<Animation*> sequentialScript;
  for (uint8_t i = 6; i < 11; i++) {
    sequentialScript.push_back(new SolidColorAnimation(leds[i], BLUE, 250));
  }

  progressAnimation = new SequentialAnimation(sequentialScript);
  pushCompleteAnimation = new SolidColorAnimation(leds[10], GREEN, 1000);
  pullCompleteAnimation = new SolidColorAnimation(leds[6], GREEN, 1000);
}
We also moved most everything related to each action (swiping, switching branches, commits) into their own headers and left the main .ino file for configuration and executing the actual update functions for each part. Separating out the code into headers and classes helped organize it a lot better than my first prototype which included everything in the main .ino file but separated out actions into functions.
Actually pushing to GitHub
To make things a bit more fun, I wanted to get the soft potentiometer push and pull functionality actually working. To do this, I read Arduino’s serial for the text 'push' or 'pull', this then executed a bash script via Processing that would write 'commit' to the readme file on the repository. Pretty basic for a command, but I wanted to show that it was at least possible to do. You can still see the commits done over the course of the whole class demo night on the public repo: https://github.com/kfrank/gitbit-output
cd /Users/klarefrank/Dev/gitbit-output
echo "commit" >> README.md
git add -A
git commit -m "commit via gitbit device"
git push git@github.com:kfrank/gitbit-output.git master
Bash script for pushing
Creating the final physical prototype

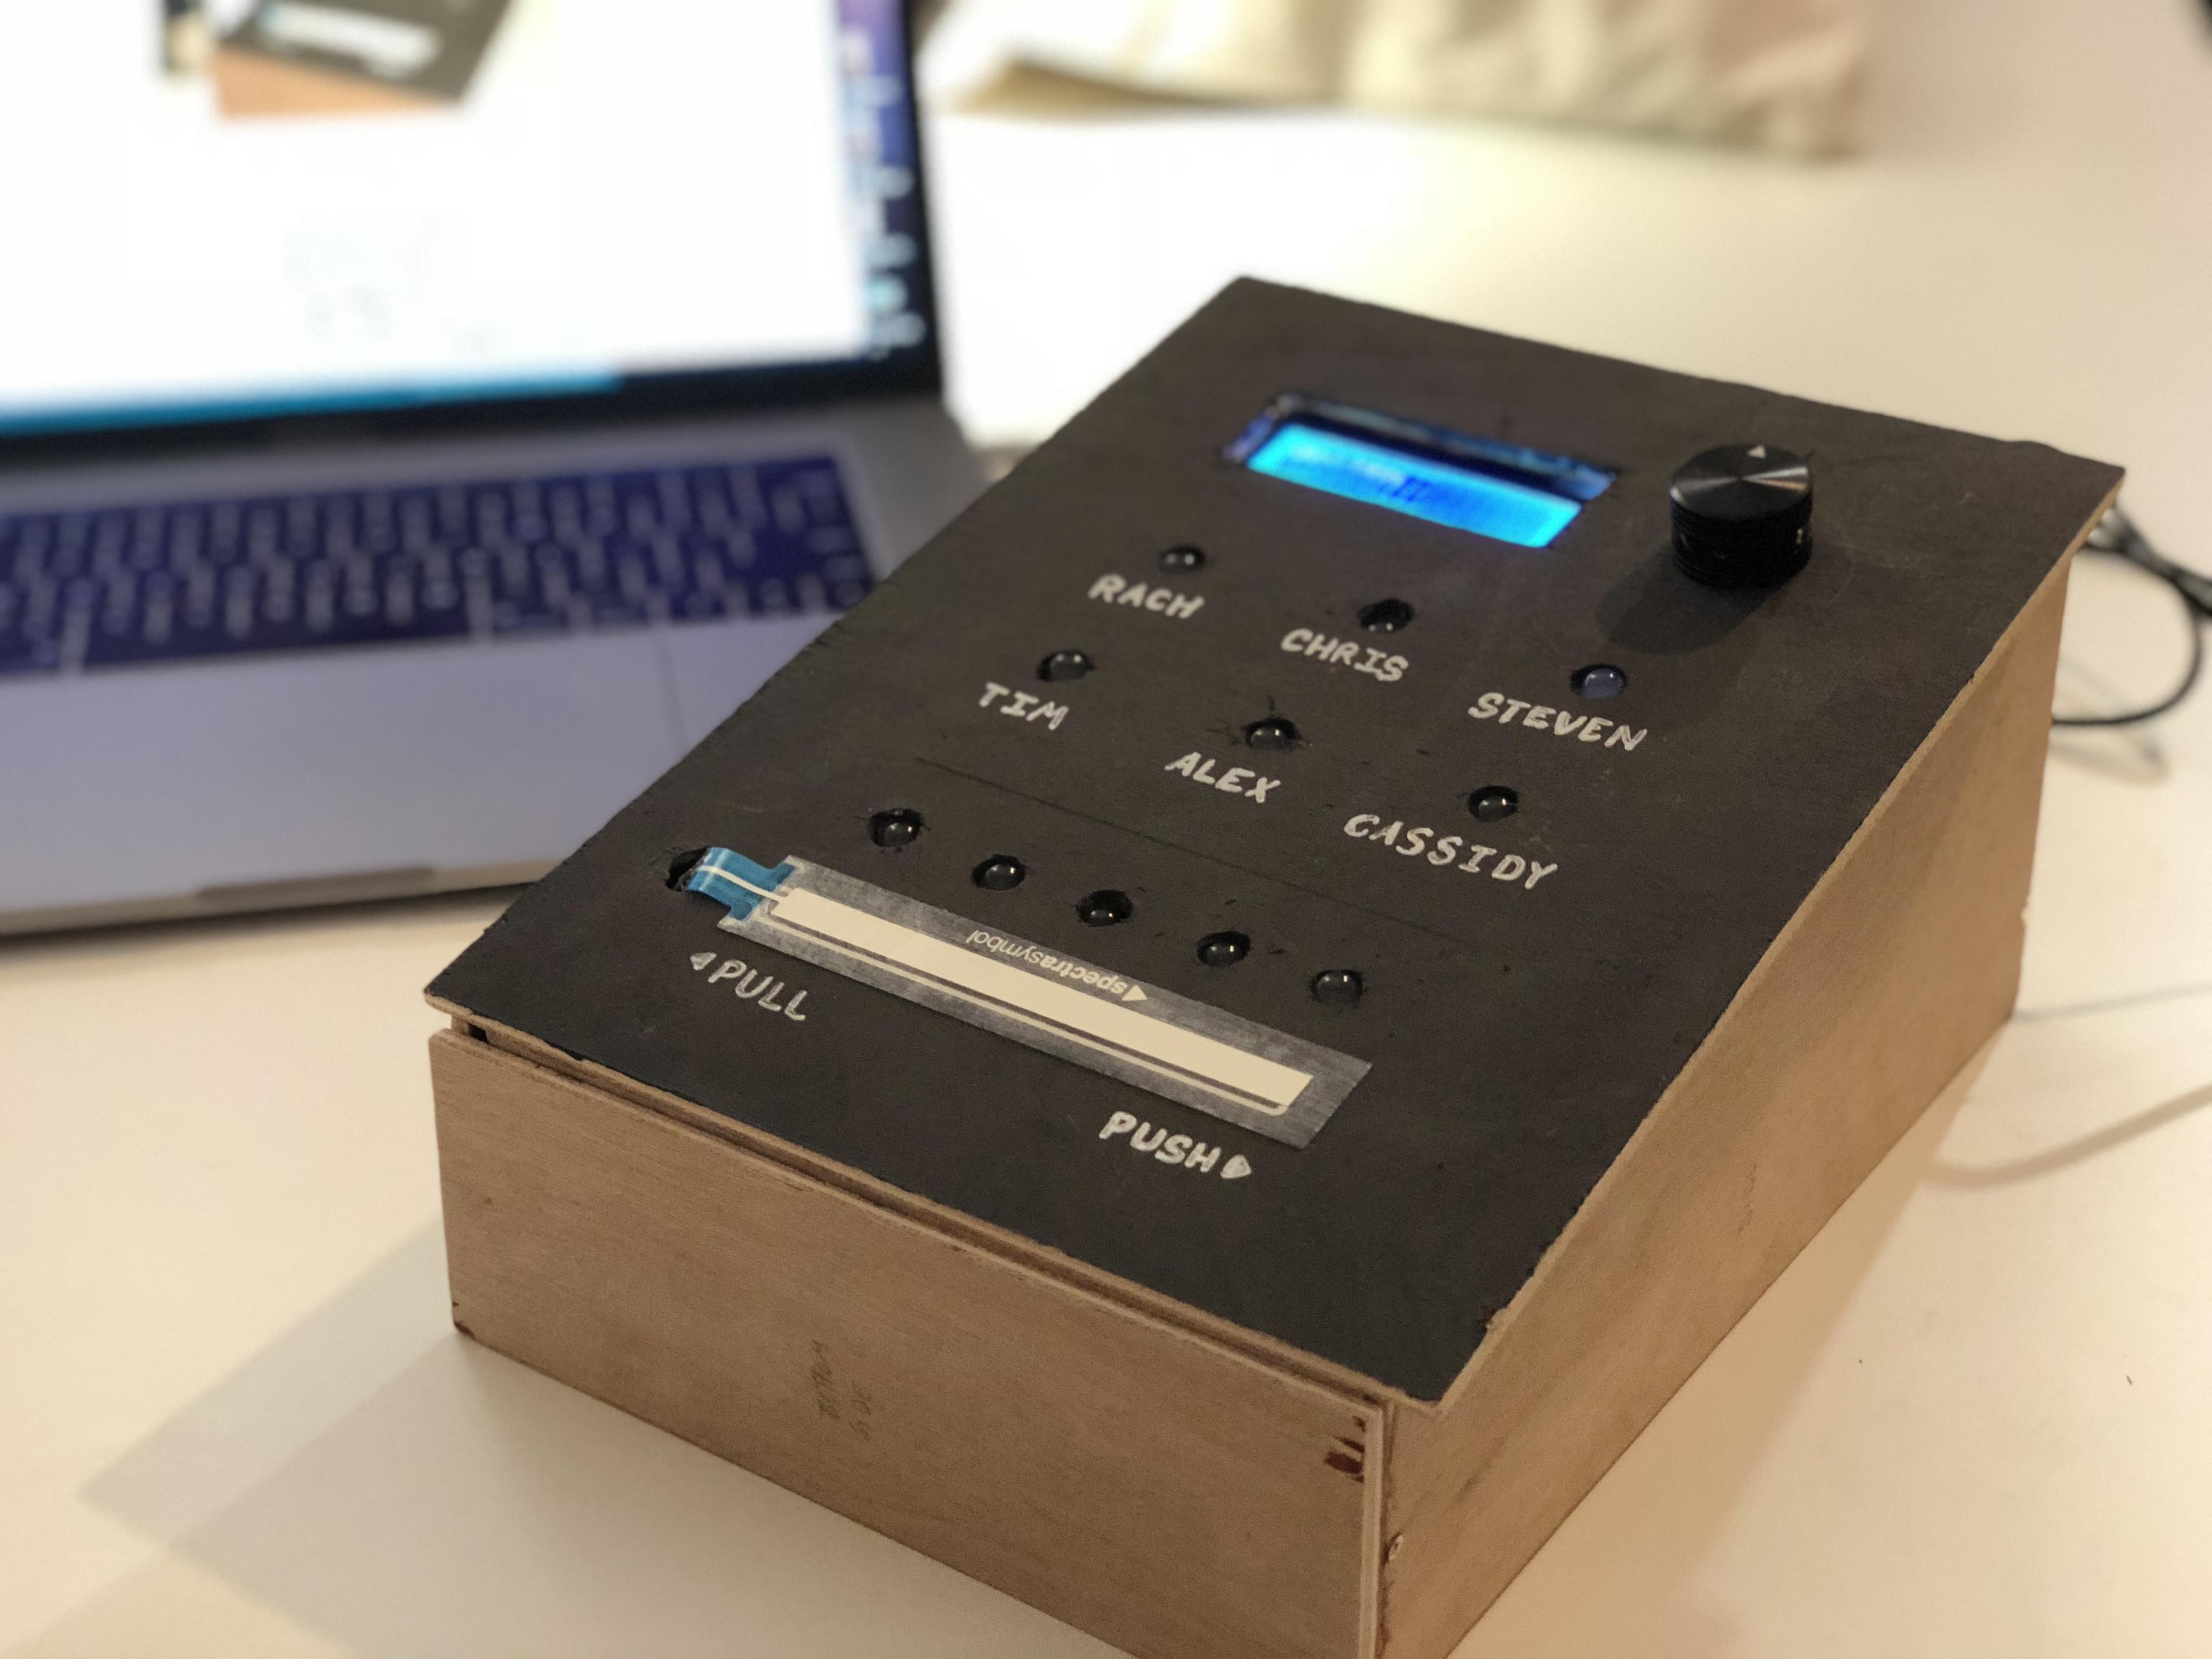
I also ended up switching out the two buttons next to the LCD for the sweet potentiometer knob I was using before for pushing and pulling. Since this was a fixed list for this demo, it made sense to be able to just keep the knob in its last position.
Overall, it was a fairly fun project to work on. I’ve since donated most of my parts to a fellow grad student, but kept the LED strip in case I want to use it for another project with a more robust board. I definitely feel Arduino projects are extremely easy to jump into, especially with the wide range of projects and demos available on the Adafruit website.